
Visual Image Manager - Build Using Python
#@ Contents
#1: Introduction
#2: Tutorial
#3: Download
#3.1: https://sourceforge.net/projects/visualimageviewer/
#4: Documentation
##4.1 : Supported file formats
http://pillow.readthedocs.org/en/latest/handbook/image-file-formats.html
##4.2 : What You Will Learn from This script.
#5: FAQ
So, let's take a look at, What is Visual Image Manager:
#1: Introduction
Visual Image Manager :: Allows you to manage Image Visually, Instead of just coping and pasting to
given location, You can Do this using This Application, just by pressing defined keys.
Listen, I had 8000 Images on to my computer, and Today I looking for a way to manage my all images so
that these will be usefull.
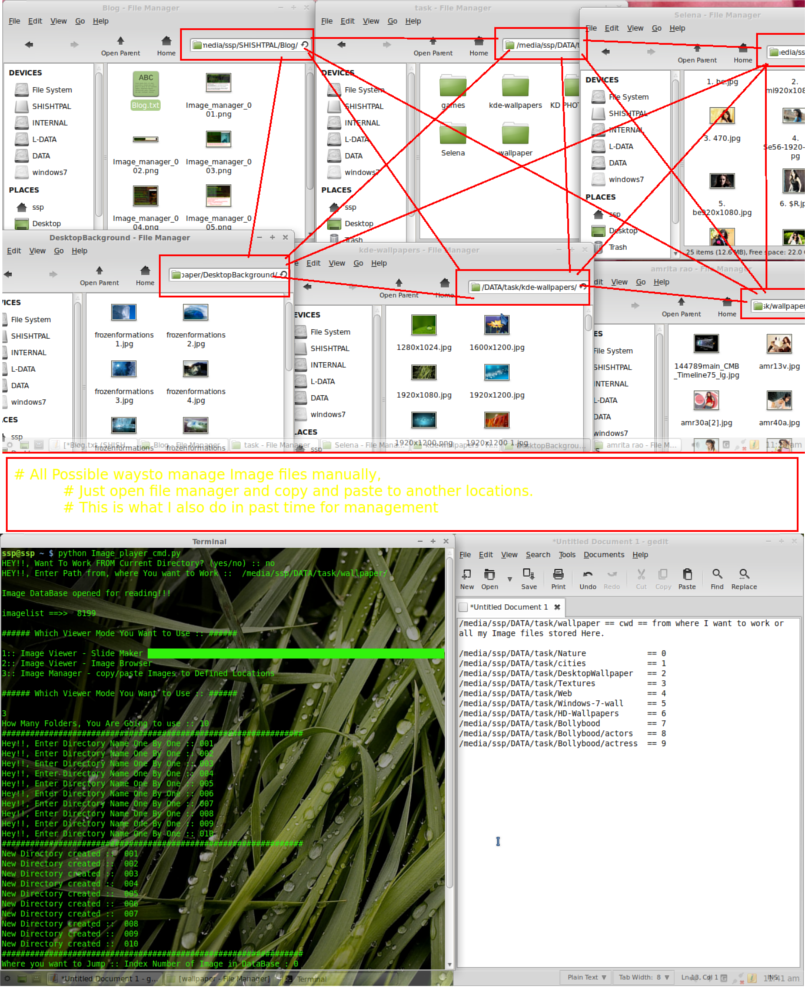
How to Manage Images: (There are Two ways. )
##1: Manage Manually, ( Copy and paste to defined locations )
##2: Use This Application
##@ What Do you mean By Defined Location.
Defined Locations are just PATH to some directories or folders,
just like that, I said, Where is Your Desktop on Your Computer, You said, "C:\Users\S\Desktop"
so , C:\Users\S\Desktop is a defined location with in Your computer Envirenment.
Note for Windows Users :: Remember that, In Python language,
"C:\Users\S\Desktop"( Do not Use This PATH Notation In Python ) == "C:\\Users\\S\\Desktop"( use This PATH )
So, Learn this while working on windows with PATHS.
But Before Managing a lot of Image Files, using this Program you have to define your own custom locations, so that
Later You can use all these locations with refrence to a defined KEYBOARD KEY.
#2: Tutorial
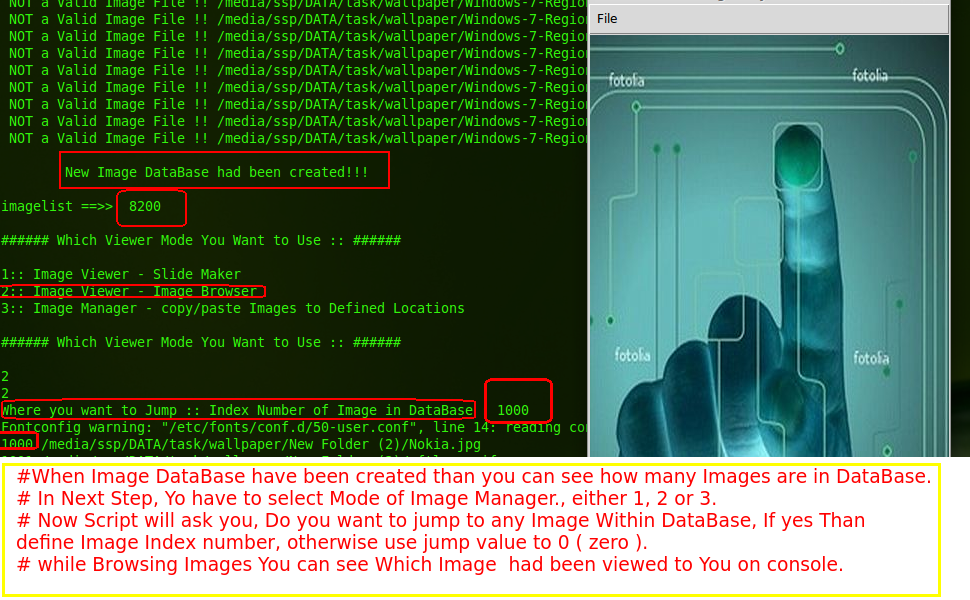
This application has 3 modes for Image Management,
1: Image Slide Maker
( This Application will use a Time-Gap value, which is defined as the time in seconds between two frames of Images. )
( You might listen FPS - for a Video File, which refers for Frame per seconds, )
( But In This case, we use Time-Gap, means Tell your Computer, Hey Wait for 0.5 seconds before viewing next Image. )
( Higher the Value of time-Gap, slower will be rate of Image Management. )
( Great when you have some time to view your All Images without pressing a key. )
2: Image Browser
( Manually Browse Image files. )
( You have to use KeyBoard Right-Key to view Next Image. )
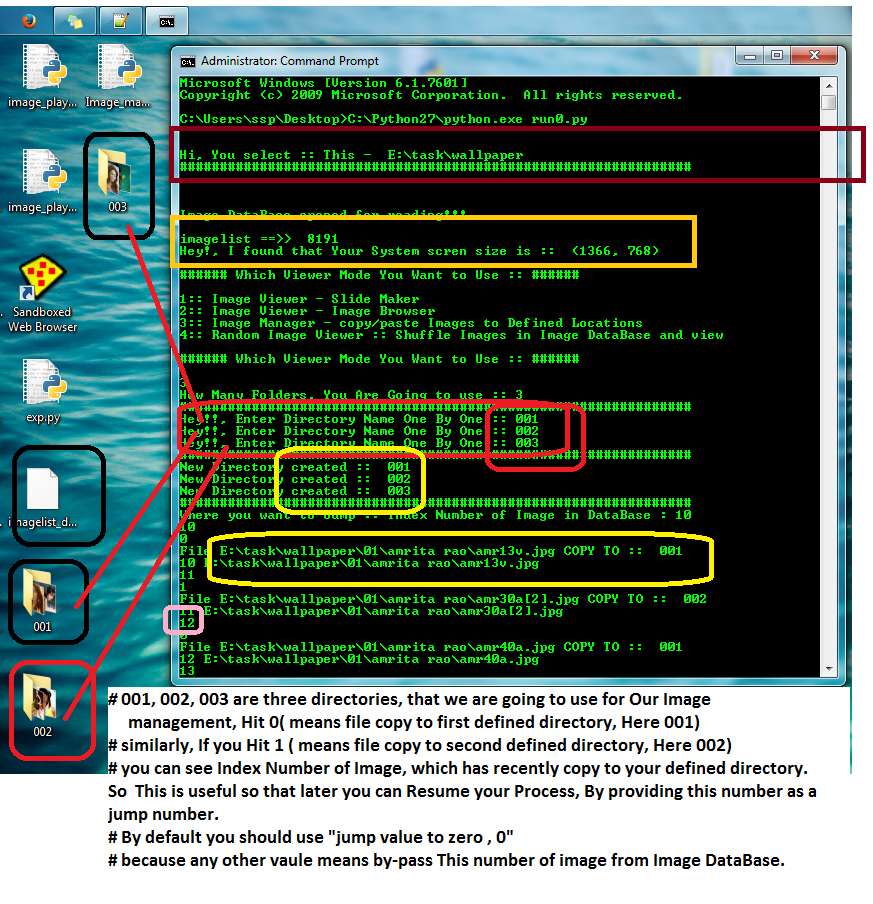
3: Image Manager


( Great When you are working with a lot of Image Files. )
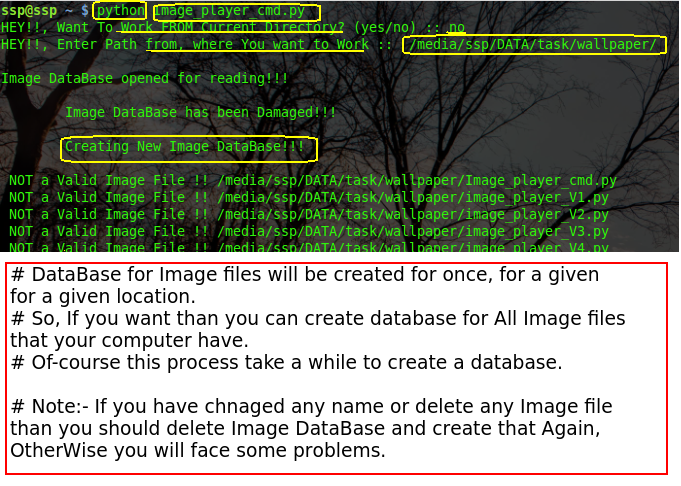
( Create a DataBase for all Image Files That stored in a given computer PATH/ location )
( Now explore all image and manage all of them according to Defined locations. )
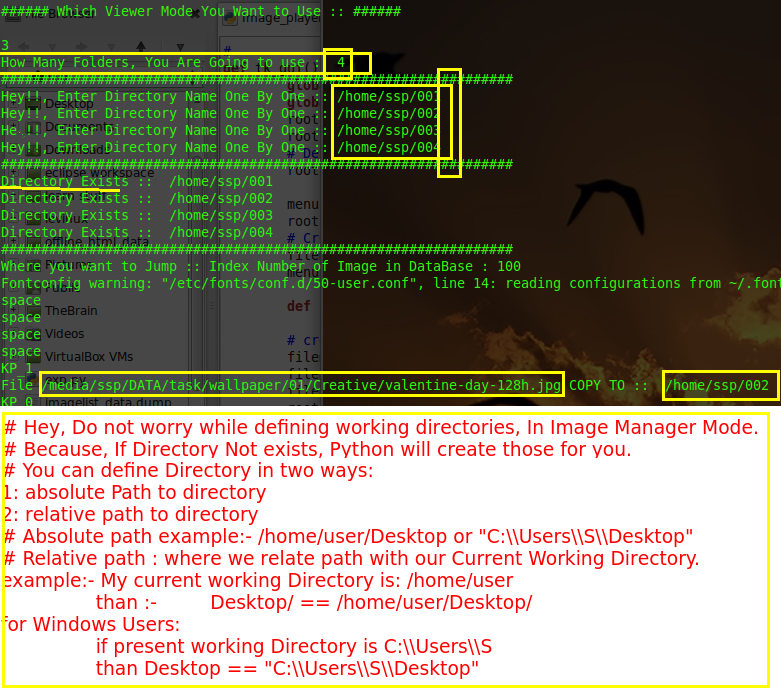
( By default you can define only 10 locations in this program, but your can define and extend the functionality of this Python Script. )
( Before Defining locations for this script, keep In mind that, you first location,
means NUMPAD-KEY_0 , Hey!!, This is what I defined in this Program.)
( similarly location-number-2, means NUMPAD-KEY_1 )
( This simply means, suppose currently you have defined location-1 as \media\ssp\DATA\task\Nature, and I press NUMPAD-KEY_0
Than That Image Will be Automatically copied to This Location-1 )
( Do not Worry for Duplicate files or Image Files with same name and same directory, Because time is a unique quantity,
so I define Concatenation of time to the file name if found two Images With Same Name, later you can found , Hey these are All those image
files with same name, So you Know better How to deal with Image files with same name, Now visually you can say that, Hey This is a Duplicate file.)

( NOTE:- If you have changed any file name or delete/move any Image File from your defined cwd location, than next time Before running this Program
You have to reload the DataBase, Because DataBase has been Corupted and Should be re-created. )
( Re-loading Image DataBase means :: just delete "imagelist_data.dump" file, which you will found in cwd, ( cwd means, from which computer PATH
you are running this Script. ))
#3: Download
##1: Linux users
Download Python Script ( Need to install Numpy, Pillow, Tkinter )
Download Portable-Linux-Package_Build _Using-CDE
##2: Windows users
Download Python Script ( If You have installed Python Interpreter, )
Download Portable- Visual Image Manager ( If you do not Have Python or you are a Simple Computer User, )
Download Windows Installer ( Install this Application to Your Computer. )
##3: For Mac-OS Users
Download Python Script
#4: Documentation
##1: If you are a Windows User:
## Script started ##
##4.1 :: What You will Learn from This Script. ( If You are new to Python. )
# How to Import Python Modules to work with
# How to use os.path, os.walk functions.
# How to create a list for all Files within a given Directory, Recursively.
# How to Create Python PIL-Image Object.
# How To Create a Basic Tkinter Image Player.
# How to View image files in Tkinter User Interface.
# How to Know Which Key is being pressed from Your keyboard.
# How to Bind Key-Board Events to your Tkinter user Interface.
# How to Bind Multiple Key-Board Events to your Tkinter Interface and manage all of them.
# How to use root.mainloop() = for a Tkinter Interface Works.
# How to use root.quit() to exit Tkinter Interface.
# How to Copy files using shutil Python Module.
# How to DUMP python objects to file and load them back whenever needed using Python-Pickle Module.
# How to fix the location of Tkinter Interface on your Desktop Screen.
# How to Add a menu bar to Tkinter Interface and bind button/seperator to Menubar.
# How to add canvas to Tkinter window.
# How to add scroll-bar to Tkinter Interface and set with canvas Image tag.
#5: FAQs
##1: I found This Problem, while Running Script.

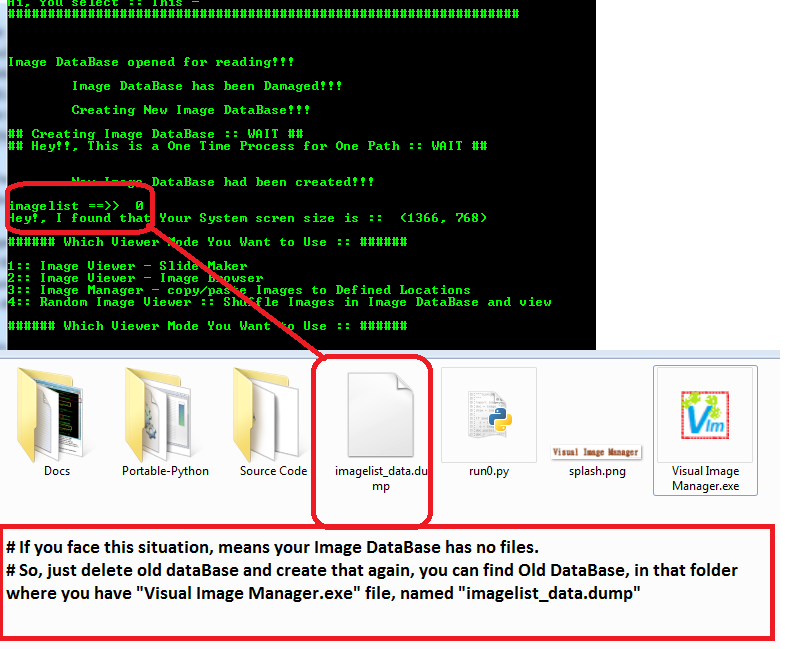
##2: Image DataBase Problem.
( You may face Image Database Problems only if when you have either rename or delete/move any Image file within your Image Current working Directory, So if you have Problems, just delete old database file, and Create a new Image Database Again. )
##3: How can I Extend The Funcationality of this script.
( You Know that this is a Python Script and I have Build this using Tkinter, PIl Python Module, So if You want than you can use any Function from these Python Modules to Improve the Features of this script., Like a Zoom function for a Image, I will Add that in newer Version of This script,, )
##4: How Single File Python InterPreter Works.
( Single File Python Interpreter is a Python script build using python and py2exe
module and this is good for Windows, specially for those who are just simple user and so that in next release of this script, this just have to download Newer Version instead of full Installer, means you have to replace Old Python Script with new One. )
##5: How to UN-Install this Application.
( This application is Build using Python so you do not have to UN-install this application, because this is Portable, just delete the files. )
##6: How To run This Application from a USB or Mico-SD Card.
( This Application is fully Portable so you can Run this from your USB Drive, without Installing Python or any thing else. )
##7: I Have this Problem.
( Any other Problem, just comment or Email me, I will do what you do not want to DO . )
#@ Contents
#1: Introduction
#2: Tutorial
#3: Download
#3.1: https://sourceforge.net/projects/visualimageviewer/
#4: Documentation
##4.1 : Supported file formats
http://pillow.readthedocs.org/en/latest/handbook/image-file-formats.html
##4.2 : What You Will Learn from This script.
#5: FAQ
So, let's take a look at, What is Visual Image Manager:
#1: Introduction
Visual Image Manager :: Allows you to manage Image Visually, Instead of just coping and pasting to
given location, You can Do this using This Application, just by pressing defined keys.
Listen, I had 8000 Images on to my computer, and Today I looking for a way to manage my all images so
that these will be usefull.
How to Manage Images: (There are Two ways. )
##1: Manage Manually, ( Copy and paste to defined locations )
##2: Use This Application
##@ What Do you mean By Defined Location.
Defined Locations are just PATH to some directories or folders,
just like that, I said, Where is Your Desktop on Your Computer, You said, "C:\Users\S\Desktop"
so , C:\Users\S\Desktop is a defined location with in Your computer Envirenment.
Note for Windows Users :: Remember that, In Python language,
"C:\Users\S\Desktop"( Do not Use This PATH Notation In Python ) == "C:\\Users\\S\\Desktop"( use This PATH )
So, Learn this while working on windows with PATHS.
But Before Managing a lot of Image Files, using this Program you have to define your own custom locations, so that
Later You can use all these locations with refrence to a defined KEYBOARD KEY.
#2: Tutorial
This application has 3 modes for Image Management,
1: Image Slide Maker
( This Application will use a Time-Gap value, which is defined as the time in seconds between two frames of Images. )
( You might listen FPS - for a Video File, which refers for Frame per seconds, )
( But In This case, we use Time-Gap, means Tell your Computer, Hey Wait for 0.5 seconds before viewing next Image. )
( Higher the Value of time-Gap, slower will be rate of Image Management. )
( Great when you have some time to view your All Images without pressing a key. )
2: Image Browser
( Manually Browse Image files. )
( You have to use KeyBoard Right-Key to view Next Image. )
3: Image Manager
( Great When you are working with a lot of Image Files. )
( Create a DataBase for all Image Files That stored in a given computer PATH/ location )
( Now explore all image and manage all of them according to Defined locations. )
( By default you can define only 10 locations in this program, but your can define and extend the functionality of this Python Script. )
( Before Defining locations for this script, keep In mind that, you first location,
means NUMPAD-KEY_0 , Hey!!, This is what I defined in this Program.)
( similarly location-number-2, means NUMPAD-KEY_1 )
( This simply means, suppose currently you have defined location-1 as \media\ssp\DATA\task\Nature, and I press NUMPAD-KEY_0
Than That Image Will be Automatically copied to This Location-1 )
( Do not Worry for Duplicate files or Image Files with same name and same directory, Because time is a unique quantity,
so I define Concatenation of time to the file name if found two Images With Same Name, later you can found , Hey these are All those image
files with same name, So you Know better How to deal with Image files with same name, Now visually you can say that, Hey This is a Duplicate file.)
( NOTE:- If you have changed any file name or delete/move any Image File from your defined cwd location, than next time Before running this Program
You have to reload the DataBase, Because DataBase has been Corupted and Should be re-created. )
( Re-loading Image DataBase means :: just delete "imagelist_data.dump" file, which you will found in cwd, ( cwd means, from which computer PATH
you are running this Script. ))
#3: Download
##1: Linux users
Download Python Script ( Need to install Numpy, Pillow, Tkinter )
Download Portable-Linux-Package_Build _Using-CDE
##2: Windows users
Download Python Script ( If You have installed Python Interpreter, )
Download Portable- Visual Image Manager ( If you do not Have Python or you are a Simple Computer User, )
Download Windows Installer ( Install this Application to Your Computer. )
##3: For Mac-OS Users
Download Python Script
#4: Documentation
##1: If you are a Windows User:
## Script started ##
#!/usr/bin/env python
# file name : Visual image manager with Image Slide Maker and Image Browser
# Operating System : linux, I am using Slax.
# Developed by:: Shishtpal singh
# Blog:: shishtpal.blogspot.in

import Tkinter as tk
from PIL import Image
from PIL import ImageTk
import tkFileDialog
import tkMessageBox
import os, sys, pickle, time, shutil, ctypes
import numpy as np

"""
### current Directory means :: directory from/in which you are running your This Python Script.
So, If you have Installed this on windows, this will be better to define your current directory by yourself.
But If you are a linux User :: than you can Run this Python script from any directory.. That's aa good point,
if you run this script from That directory, which contents yoyr Image Files.

### jump :: jump means, from which index location you want to explore Images.
 => suppose, first time when i run this script, I have explored Images Up to 100 index within Image Database.
 => So, what next time, when you run this script, you just have to define a value for jump,
 => I this example, first time I have explored Images up to Image Index 100, So next time I have to define
 => jump value to 101.
"""
# Where to start walking...

def dir_select():
 global cwd
 global root
 #im = Image.open("splash.png")
 root = tk.Tk()
 #root.geometry('%dx%d' % (im.size[0], im.size[1]))
 #photo = ImageTk.PhotoImage(im)
 #image_label = tk.Label(root, image=photo)
 #image_label.place(x=0, y=0)
 #root.update()
 time.sleep(1)
 #### setting up a splash screen for application..
 cwd = tkFileDialog.askdirectory(title="Select a Directory, From You Want To Work !!")

 #print cwdw
 root.destroy()
 #### Closing a un-wanted Tkinter window
 print "\n"
 print "Hi, You select :: This - ", cwd
 print "##"*32
 print "\n"


# function name :: each_image_file
def each_image_file(cwd):
 """ This function is used to create a imagelist with PIL image Objects.., loop through
 each direcrory for image and create two lists, 1:: imagelist ( path+name of image
  2:: imlist( PIL image objets.. ))"""
 global files, imagelist
 files = []           # total number of files found while walking into given path..
 imagelist = []     # Valid image file list
 # Creating a list of total files while walking..
 for i in zip(os.walk(cwd)):
  files.append(i)

 print "## Creating Image DataBase :: WAIT ##"
 print "## Hey!!, This is a One Time Process for One Path :: WAIT ##\n"
 # Now Processing time..
 for i in range(len(files)): # create a index number for acessing a given directory having root, dirs, files ..
  for j in files[i][0][2]: # accessing only files from that directory, selected using index number i ..
   try:
    imf = os.path.join(files[i][0][0], str(j))
    # print str(imf)
    # """
    im = Image.open(str(imf))
    print "Image Found :: ", str(imf)
    del im
    # if this line_code executes sucessfully, means valid image file,
    # and our next step will be to recoed the name of valid image file to imagelist..
    imagelist.append(imf)
    # """
   except:
    #print " NOT a Valid Image File !!", os.path.join(files[i][0][0], str(j))
    pass


# DataBase will be saved in your current working directory!!!
def read_database():
 global imagelist
 if os.path.exists('imagelist_data.dump'):
  database = open('imagelist_data.dump', 'r')
  print "\nImage DataBase opened for reading!!!\n"
  if database.readline().split()[0] == cwd:
   imagelist = pickle.load(database)
  else:
   print "\tImage DataBase has been Damaged!!!\n"
   print "\tCreating New Image DataBase!!!\n"
   create_database()
 else:
  create_database()

def create_database():
 each_image_file(cwd)
 database = open('imagelist_data.dump', 'w')
 database.write(cwd+'\n')
 pickle.dump(imagelist, database)
 print "\n\tNew Image DataBase had been created!!!\n"
 database.flush()
 database.close()
 database = open('imagelist_data.dump', 'r')
#

dir_select()
read_database()
print "imagelist ==>> ", len(imagelist)
while len(imagelist) == 0:
 print "Hey!, Delete This Image DataBase and Create Again!!\n"
 time.sleep(4)


####

def ScrolledCanvas():
 global im
 global screensize
 global root
 global timegap
 global canv
 root = tk.Tk()
 root.bind('<Right>', lambda e: root.quit())
 root.wm_title("Image Player ")
 root.wm_geometry(newGeometry='500x400+20+20')
 # Default position of Tk root window on desktop from left upper corner

 screensize = (root.winfo_screenwidth(), root.winfo_screenheight())
 menubar = tk.Menu(root)
 root.config(menu=menubar)
 filemenu = tk.Menu(menubar)
 menubar.add_cascade(label='File', menu=filemenu)

 def sayHello(): print "Hello, I am Happy!!"

 # create action for button 'Quit'
 filemenu.add_command(label='Print', command=sayHello)
 filemenu.add_separator()
 filemenu.add_command(label='Quit', command=sys.exit)
 #root.bind('<Right>', lambda e: root.quit())

 canv = tk.Canvas()

 canv.config(highlightthickness=0)
 sbarV = tk.Scrollbar(orient=tk.VERTICAL)
 sbarH = tk.Scrollbar(orient=tk.HORIZONTAL)
 sbarV.config(command=canv.yview)
 sbarH.config(command=canv.xview)
 canv.config(yscrollcommand=sbarV.set)
 canv.config(xscrollcommand=sbarH.set)
 sbarV.pack(side=tk.RIGHT, fill=tk.Y)
 sbarH.pack(side=tk.BOTTOM, fill=tk.X)
 canv.pack(side=tk.LEFT, expand=tk.YES, fill=tk.BOTH)


#
def image_viewer():
 jump = input("Where you want to Jump ::\nIndex Number of Image in DataBase( like- 0 or 10 etc. ) : ")
 global imp
 global im
 ScrolledCanvas()

 try:
  for i in range(jump, len(imagelist)):
   im = Image.open(imagelist[i])
   im1 = im.copy()
   width, height = im1.size
   canv.config(scrollregion=(0, 0, width, height))
   im2 = ImageTk.PhotoImage(im1)
   imtag = canv.create_image(0, 0, anchor="nw", image=im2)
   canv.config(width=im1.size[0], height=im1.size[1])

   iLength, iWidth = im1.size
   #"""##
   if screensize[0] < im.size[0]:
    iLength = screensize[0]
   if screensize[1] < im.size[1]:
    iWidth = screensize[1] - 100
   #"""##
   msg = ''
   global imf
   print i
   imf = imagelist[i]

   #"""#
   root.geometry('%dx%d' % (iLength, iWidth))
   root.update()
   if imp == 2:
    root.mainloop()
   elif imp == 3:
    root.bind_all("<Key>", event_manager)
    root.mainloop()
   else:
    time.sleep(timegap)
    #root.destroy()

   print i, imagelist[i]

 except:
  print "Error While Opening Image File..", imagelist[i]
  print "\nMay be, This Image is corrupted or Not Supported!!"
  pass

#
#
def event_manager(event):
 global msg
 if event.char == event.keysym:
  msg = "Nomrmal key %r" % event.char
 elif event.char == 1:
  msg = "Puncutation Key %r ( %r)" % (event.keysym, event.char)
 else:
  msg = "Special key %r" %  event.keysym
 msg = event.keysym
 #print msg
 """
 This Function shows, Hey, you have type this key!!
 """
 def if_exist_change_name(i):
  if os.path.exists(os.path.join(locations[i], os.path.basename(imf))):
   old_name = os.path.join(locations[i], os.path.basename(imf))
   new_name = os.path.join(locations[i], os.path.splitext(old_name)[0]+str(time.time())+os.path.splitext(old_name)[1])
   print old_name, new_name
   os.rename(old_name, new_name)
 #### This Function is used, When There are more Than one Images with same name in your same folder.
 #### And we Are Using time.time() function which always return a unique value, because time will always be unique.
 if msg == '0':
  print "File", imf, "COPY TO :: ", locations[0]
  if_exist_change_name(0)
  shutil.copy2(imf, locations[0]); root.quit()
 if msg == '1':
  print "File", imf, "COPY TO :: ", locations[1]
  if_exist_change_name(1)
  shutil.copy2(imf, locations[1]); root.quit()
 if msg == '2':
  print "File", imf, "COPY TO :: ", locations[2]
  if_exist_change_name(2)
  shutil.copy2(imf, locations[2]); root.quit()
 if msg == '3':
  print "File", imf, "COPY TO :: ", locations[3]
  if_exist_change_name(3)
  shutil.copy2(imf, locations[3]); root.quit()
 if msg == '4':
  print "File", imf, "COPY TO :: ", locations[4]
  if_exist_change_name(4)
  shutil.copy2(imf, locations[4]); root.quit()
 if msg == '5':
  print "File", imf, "COPY TO :: ", locations[5]
  if_exist_change_name(5)
  shutil.copy2(imf, locations[5]); root.quit()
 if msg == '6':
  print "File", imf, "COPY TO :: ", locations[6]
  if_exist_change_name(6)
  shutil.copy2(imf, locations[6]); root.quit()
 if msg == '7':
  print "File", imf, "COPY TO :: ", locations[7]
  if_exist_change_name(7)
  shutil.copy2(imf, locations[7]); root.quit()
 if msg == '8':
  print "File", imf, "COPY TO :: ", locations[8]
  if_exist_change_name(8)
  shutil.copy2(imf, locations[8]); root.quit()
 if msg == '9':
  print "File", imf, "COPY TO :: ", locations[9]
  if_exist_change_name(9)
  shutil.copy2(imf, locations[9]); root.quit()
 #### This is how to dael with Diffrent keystokes performed and which actions
 #### should be run when a defined key is being pressed.


#

print "\n###### Which Viewer Mode You Want to Use :: ######\n"
print "1:: Image Viewer - Slide Maker "
print "2:: Image Viewer - Image Browser"
print "3:: Image Manager - copy/paste Images to Defined Locations"
print "4:: Random Image Viewer :: Shuffle Images in Image DataBase and view"
print "\n###### Which Viewer Mode You Want to Use :: ######\n"

def __vdoc__():
 """
 1: Image Viewer Mode :: means just define where to start slide show and define time-gap between each image and sit back...
 2: Image Browser Mode :: means allow you to browse Images manually, just Hit "Right" allow on your keyboard abd Hey!! now you will be next image that had been defined in Image DataBase.

 3: Image Manager :: Gives you the ability to manage thousands of Image from your keyboard,
 just Browse Images and define folders where you want to copy that Image, which you are currently Viewing..
 for example:-
 I have 8000 Image files and now I want to classify all those Image to according to tag ( or what a Image says )
 so let I defined :: 4 directories where I want to copy my images according to image property.
 first Directory :: /home/user/flowers
 second directory :: /home/user/nature
 third directory :: /home/user/BollyBood
 fourth directory :: /home/user/BollyBood/Actress

 # Now processing Part ::
  Hey!!, when you see an Image of "folwer" in Image Manager Window ==> Hey, For what you are waiting, just HIT 'Numpad key 1' key.
  Hey!!, when you see an Image of "nature in Image Manager Window ==> Hey, For what you are waiting, just HIT 'Numpad key 2' key.
  Hey!!, when you see an Image of "image related to BollyBood" in Image Manager Window ==> Hey, For what you are waiting, just HIT 'Numpad key 3' key.
  Hey!!, when you see an Image of "BollyBood - actress image" in Image Manager Window ==> Hey, For what you are waiting, just HIT 'Numpad key 4' key.

 fo far so good, By default I have defined "Numpad Keys from "0, 1, 2, 3, 4, 5, 6, 7, 8, 9""
  => means You are allowed to define 10 locations for Image Management.
  => But do not Worry, you can define as many as you can, either using standard events, or using your own virtual event, and define
   all those events into "event_manager function ."
 """


#
imp = 1
wselect = raw_input("")
if wselect == '1':
 timegap = input("Time-Gap between two Images (like - 0.5, 1) :: ")
 image_viewer()
 root.mainloop()
#
if wselect == '2':
 #print wselect
 imp = 2
 image_viewer()
#
if wselect == '3':
 imp = 3
 imf = ''
 nloc = input("How Many Folders, You Are Going to use :: ")
 print "##"*32
 locations = []
 for i in range(nloc):
  locations.append(raw_input("Hey!!, Enter Directory Name One By One :: "))
 print "##"*32
 for j in locations:
  if os.path.exists(j):
   print "Directory Exists :: ", j
  else:
   os.makedirs(j)
   print "New Directory created :: ", j
 print "##"*32
 image_viewer()
#
if wselect == '4':
 print "\n\t#### Shuffle Image files in Image DataBase :: #### \n\n"
 np.random.shuffle(imagelist)
 timegap = input("Time-Gap between two Images (like - 0.5, 1) :: ")
 image_viewer()
 root.mainloop()
#


#
if __name__ == "__main__":
 pass
############################### Script Ends ##################################4.1 :: What You will Learn from This Script. ( If You are new to Python. )
# How to Import Python Modules to work with
# How to use os.path, os.walk functions.
# How to create a list for all Files within a given Directory, Recursively.
# How to Create Python PIL-Image Object.
# How To Create a Basic Tkinter Image Player.
# How to View image files in Tkinter User Interface.
# How to Know Which Key is being pressed from Your keyboard.
# How to Bind Key-Board Events to your Tkinter user Interface.
# How to Bind Multiple Key-Board Events to your Tkinter Interface and manage all of them.
# How to use root.mainloop() = for a Tkinter Interface Works.
# How to use root.quit() to exit Tkinter Interface.
# How to Copy files using shutil Python Module.
# How to DUMP python objects to file and load them back whenever needed using Python-Pickle Module.
# How to fix the location of Tkinter Interface on your Desktop Screen.
# How to Add a menu bar to Tkinter Interface and bind button/seperator to Menubar.
# How to add canvas to Tkinter window.
# How to add scroll-bar to Tkinter Interface and set with canvas Image tag.
#5: FAQs
##1: I found This Problem, while Running Script.
##2: Image DataBase Problem.
( You may face Image Database Problems only if when you have either rename or delete/move any Image file within your Image Current working Directory, So if you have Problems, just delete old database file, and Create a new Image Database Again. )
##3: How can I Extend The Funcationality of this script.
( You Know that this is a Python Script and I have Build this using Tkinter, PIl Python Module, So if You want than you can use any Function from these Python Modules to Improve the Features of this script., Like a Zoom function for a Image, I will Add that in newer Version of This script,, )
##4: How Single File Python InterPreter Works.
( Single File Python Interpreter is a Python script build using python and py2exe
module and this is good for Windows, specially for those who are just simple user and so that in next release of this script, this just have to download Newer Version instead of full Installer, means you have to replace Old Python Script with new One. )
##5: How to UN-Install this Application.
( This application is Build using Python so you do not have to UN-install this application, because this is Portable, just delete the files. )
##6: How To run This Application from a USB or Mico-SD Card.
( This Application is fully Portable so you can Run this from your USB Drive, without Installing Python or any thing else. )
##7: I Have this Problem.
( Any other Problem, just comment or Email me, I will do what you do not want to DO . )
No comments :
Post a Comment